
Hi everyone! Happy Tuesday to you! Today is the Taylored Expressions Spooktacular release and I have three cards to share with you using a lot of goodies from the release. There are LOTS of amazing deals and bundles in this release so make sure to check them out too.

My first card uses items from the Spooktacular bundle. This bundle includes:
- Halloween Scene Split 6×6 Background Stamp & Stencil Combo
- Spooktacular Sentiments stamp
- Spooktacular Sentiments Coordinating Dies
Directions for making this card:
- Make an A2 horizontal card base and set aside. Cut an A2 piece of Sugar Cube.
- Place the pumpkin portion of the Halloween Scene Split 6×6 Background Stamp in a MISTI or stamp positioner and stamp onto the bottom portion of the A2 Sugar Cube, horizontally. I used Versafine Clair Nocturne ink. If using a MISTI with paper mark where your cardstock is on the paper by lightly outlining in pencil. LEAVE the stamp in the MISTI and take the cardstock out. (I usually tape my cardstock down for this type of stamping using a roll of tape on the back.)
- Heat set the black ink.
- Place the stencil portion of the Halloween Scene Split 6×6 Background Stamp & Stencil Combo with the faces lined up with the stamped pumpkins. Using the Detail Blender Brushes ink the faces with Lemon Meringue and Candy Corn ink.
- Die cut a moon sized circle from TE’s Masking Paper using Stitched Rectangle Stacklets. Adhere the masking paper where you want the moon.

- Using Jelly Donut and Eggplant ink ink clouds in the background with Set the Scene – Clouds Stencil Strips. Remove the masking paper and re-align the cloud strip that matches the bottom of the moon. Gently and carefully overlap your clouds with the bottom of the moon using Detail Blender Brushes, take your time with this part.
- Ink the moon with Potato Chip ink (the BEST moon color ever in my opinion, lol). Let the ink overlap intentionally out into the clouds, lightly.
- Replace the cardstock in the MISTI, using the guidelines you marked earlier. Line up the bats half of the Halloween Scene Split 6×6 Background Stamp and then remove the pumpkin portion. Ink the bats with more black ink and stamp over the top of the clouds/moon.
- Trim 1/4″ off the top or bottom of the scene panel. Ink the diagonal stripe stencil from Stencil Strips – Holiday in Candy Corn ink. Trim to 5.5″x by 1″ Adhere to the bottom of the cardbase.
- Attach the Halloween scene panel to the cardbase with foam tape. Stamp the Trick or Treat sentiment from Spooktacular Sentiments on Sugar Cube and die cut with the coordinating dies. Adhere the sentiment with foam tape.

Card Supplies:
|


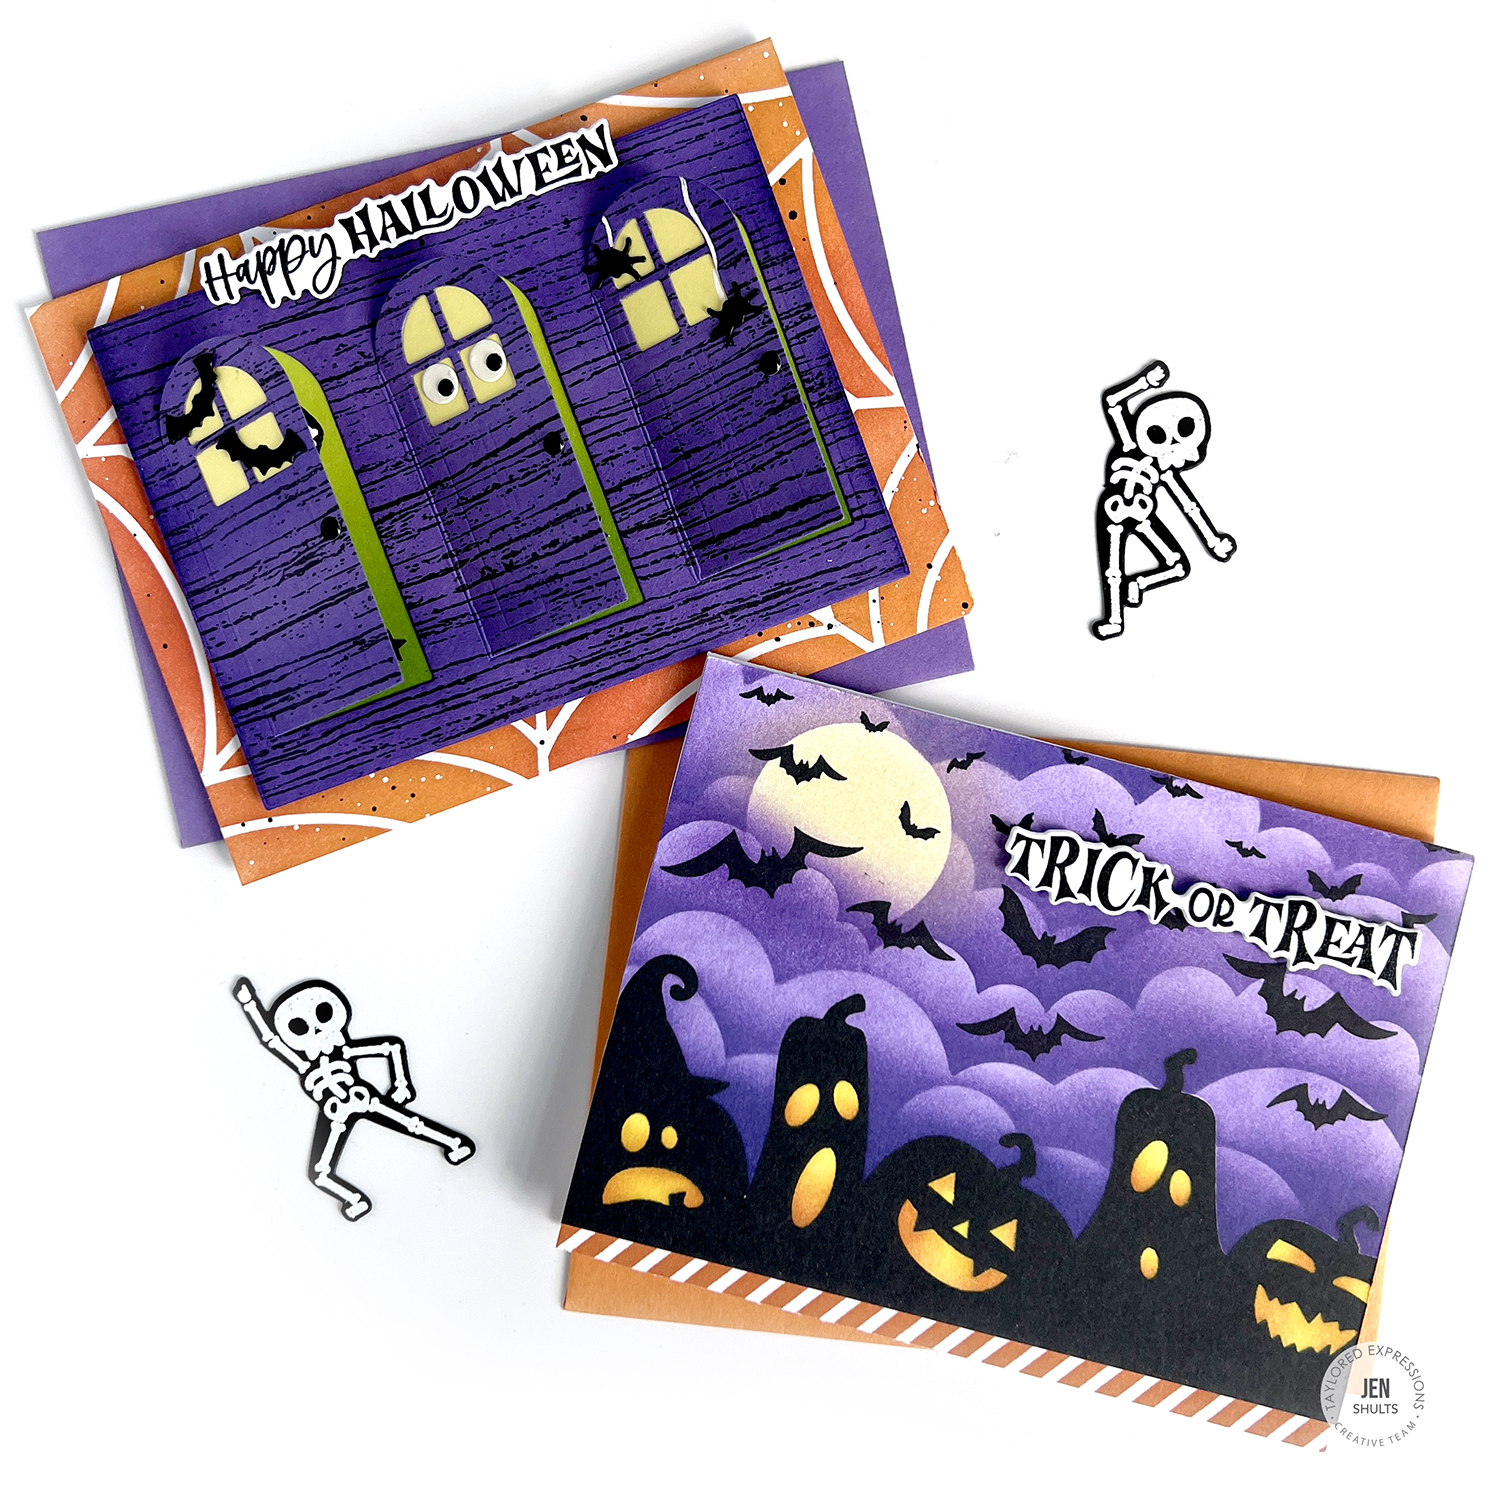
My second card features the Stayin’ Alive bundle that includes:
Directions for making this card:
- Start by making an horizontal A2 cardbase. Mask the top portion of the cardbase with Post It tape or other masking material. Line up the Spiderweb stencil over the cardbase and ink with Candy Corn and Pumpkin ink. Splatter with Dr. Ph Martin’s White and TE’s black liquid watercolor.
- Stamp a piece of Jelly Donut with the Wood Plank Background stamp in Poppy Seed ink then die cut the Another Door Opens die from Jelly Donut Cardstock then die cut with A2 Layering Stacklets. Cut the windows out from the doors and cut the window inserts from Potato Chip and adhere to the back of the door.
- Cut a piece of Kiwi cardstock that fits behind the doors. Ink with Lime Zest ink in a gradient and adhere behind the doors.

- Stamp the skeletons from Stayin’ Alive on Black Licorice cardstock with Versamark ink and head emboss with white embossing powder. Die cut with coordinating dies. Place the Skeletons in the doors and add some Bits & Pieces – Halloween Stars and Sparkles.
- Die cut the Caldron Confetti dies from Black Licorice and Sugar Cube. Assemble the eyes and add the bats, eyes and spiders to the front of the doors. Add gel pen webs to the spiders.
- Adhere the door panel to the cardbase with foam tape. Stamp the sentiment from Spooktacular Sentiments on Sugar Cube and die cut with the coordinating die. Adhere above the doors. Add Oreo Enamel Dots for door handles.
Card Supplies:
|


My last card uses some fun new multipurpose additions to TE’s Collection. This card uses Hang On which is a previously released stamp with new Hang On – Halloween Candy and Stitched Alpha. I created a blended background to set everything off. Directions are below for making this card.
- Fold a horizonal A2 cardbase and set aside. Cut an A2 piece of Sugar Cube and trim off half an inch from a long side.
- Ink blend Lemon Meringue, Candy Corn, Pumpkin, Cherry Pop, Poppy Seed and Oreo ink starting from the center and blend out. Let this dry (heat setting will speed this up but test to see if embossing powder sticks to the ink before moving on to the next step).
- Using a powder tool, de-static the blended panel. Stamp the Hang On strings in Versamark and heat emboss with white embossing powder.
- Die cut Halloween using the Stitched Alpha from Black Licorice cardstock, minus the O. Die cut two pieces of candy from Hang On – Halloween Candy. Adhere the letters to the strings, replacing the O in Halloween with a piece of candy.

- Ink a 1″ x 5.5″ strip of Sugar Cube with Poppy Seed ink over the chevron stencil in Stencil Strips – Love.
- Stamp Building Blocks – Happy Addons on Sugar Cube with Oreo ink. Die cut with the Building Blocks die. Adhere one of the Happy sentiments over the LL’s in Halloween with foam tape.
- Adhere the stencil strip piece to the bottom of the cardbase. Adhere the Halloween panel over the top with foam tape.
|


